
Day 1 of gift giving brought to you by Pam Bennett
OK...we are starting out simple
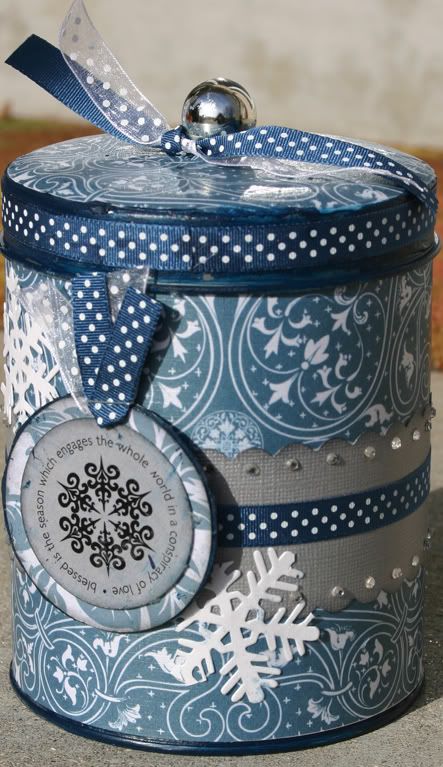
Here is an altered tin that i made for a Christmas gift, but now Gerri-anne wants it, so I am sending it to her It was pretty easy!
First....find a tin. This happens to be one I found in the clearance aisle somewhere last year (I think Target). Then you need to either paint it with acrylic paint or sand it with sandpaper. This step is necessary to help the adhesive stick to the tin and paper. Painting also helps if you have any curves or bumps that are hard to cover with paper.
Next....... cut the paper to fit. Many tins are larger than 12 inches. so you may need to cut more than one strip of paper. Try and match patterns if possible. Now, you need some adhesive. I recommend Mod Podge, applied with a foam brush. Use a thin, even layer. Apply the paper. You will need to hold it in place, but it will eventually stick.
Let it dry...as it dries, bubbles may appear. Smooth them out with your fingers. Let the tin dry. For the top, I cut a circle to the size of the tin, and adhered the same way.
If there is a handle or knob, just cut out a hole with your exacto knife. You can cut the circle halfway to get it around the knob...the cut won't be visible once you adhere it and mod podge the top. Now you can embellish with other papers. I used my Fiskars threading waters punch, and ran a strip around the tin. After you finish with the papers, you need to protect them with a layer of Mod Podge. Again, the layer should be thin and even.
More embellishments can be done...any bling and ribbon can be added after the top layer of Mod Podge is on...it can act as the adhesive.
To finish it off, I just tied some ribbon to the top. I'll fill it will some goodies and get it in the mail!


3 comments:
Pam, this is beautiful can't wait to make one. Thanks for sharing.
This is absolutely lovely!
I love this tin!
:J
Post a Comment