
 Today's Project is Brought to you by Jules!
This cute little guy takes about an hour and a half to make from start to finish and makes a great hostess gift or a fun gift to leave on a neighbor's front porch with a note, "From Frosty to you". You will need the following items
1 hurricane glass (craft store for about 2.50)
1 bottle of white acrylic paint 1 container of sparkly 'snow'
1 small bottle of black puff paint or shiny black acrylic paint
1 sheet of stiff black felt 1 sheet of soft red felt
1 sprig of holly leaves with berries
1 carrot either wooden or the end of a wax one (if you can not find one of these, you can always paint on the nose in orange paint)
1 sponge brush Clear drying liquid glue (there is a glue just for felt but almost any tacky liquid glue will work)
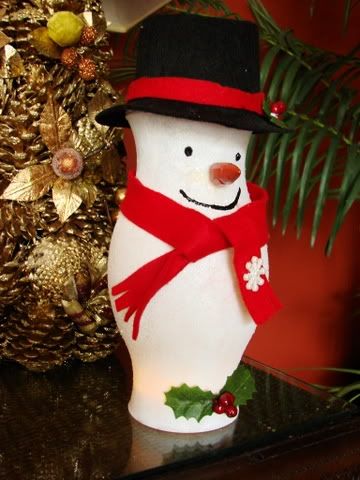
Step One: dab the white paint onto the glass with the flat sides of a sponge brush. This creates texture. While the paint is still wet, put your arm into the glass and, as you gently turn it, sprinkle the 'snow' onto the glass with your other hand. (This is easier to do with two people, but I did it by myself) Sprinkle the 'snow' over paper and put the excess back into the container. Place on wax paper or a craft mat to dry.
Step Two: assemble the hat by cutting a five inch circle out of one corner of the stiff black felt. When the glass is dry, turn it onto this circle positioning it in the middle. Trace around the glass. Cut inside the traced lines to make sure the center sits upon the glass edge and does not fall down onto the neck of the glass. Cut a 2 inch wide x 10-11 inch long strip from the black felt for the brim of the hat. Wrap to fit overlapping the ends and glue. I used a clip to hold it into place until it adhered. When the brim is secure, glue it to the circle. Finish the hat by cutting a strip from the soft red felt that is one inch wide and long enough to go around the brim of the hat. Glue into place. Cut two leaves from the holly and glue those onto the hat brim and trim. Glue one sprig of the berries on to the two leaves. Again, I used clips to hold the leaves in place while they dried
Step Three: Cut two strips from the soft red felt that measure 7 inches long by 2.5 inches wide. Fringe one of the edges on each. Over lap the two non-fringed edges on the 'back' of the snowman and glue. The fringed edges can be crossed or gently tied in the front.
Step Four: draw a mouth and two dots for eyes on the front of the snowman. It helps if you leave the hat into place for the placement of the eyes so they show beneath the brim of the hat. Glue the nose onto the snowman and place him on his back while the nose sets up. You can glue the hat to the top of the glass if you wish. Add another sprig and berries to the bottom of the front. You can even create a 'bow tie' for added cuteness! A candle under the snowman provides a wonderful effect, but when I give this gift to someone with children, I include one of the flickering battery operated mini candles instead.


2 comments:
awesome idea Jules
Jules, He is too cute, you are so clever.
Post a Comment