Sunday, December 7, 2008

12 Days of Christmas Gft Giving-Day 7

Today's Project is Brought to you by Jules!

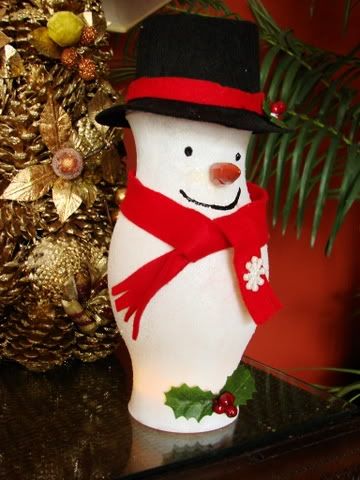
This cute little guy takes about an hour and a half to make from start to finish and makes a great hostess gift or a fun gift to leave on a neighbor's front porch with a note, "From Frosty to you". You will need the following items

1 hurricane glass (craft store for about 2.50)

1 bottle of white acrylic paint 1 container of sparkly 'snow'

1 small bottle of black puff paint or shiny black acrylic paint

1 sheet of stiff black felt 1 sheet of soft red felt

1 sprig of holly leaves with berries

1 carrot either wooden or the end of a wax one (if you can not find one of these, you can always paint on the nose in orange paint)

1 sponge brush Clear drying liquid glue (there is a glue just for felt but almost any tacky liquid glue will work)

Step One: dab the white paint onto the glass with the flat sides of a sponge brush. This creates texture. While the paint is still wet, put your arm into the glass and, as you gently turn it, sprinkle the 'snow' onto the glass with your other hand. (This is easier to do with two people, but I did it by myself) Sprinkle the 'snow' over paper and put the excess back into the container. Place on wax paper or a craft mat to dry.

Step Two: assemble the hat by cutting a five inch circle out of one corner of the stiff black felt. When the glass is dry, turn it onto this circle positioning it in the middle. Trace around the glass. Cut inside the traced lines to make sure the center sits upon the glass edge and does not fall down onto the neck of the glass. Cut a 2 inch wide x 10-11 inch long strip from the black felt for the brim of the hat. Wrap to fit overlapping the ends and glue. I used a clip to hold it into place until it adhered. When the brim is secure, glue it to the circle. Finish the hat by cutting a strip from the soft red felt that is one inch wide and long enough to go around the brim of the hat. Glue into place. Cut two leaves from the holly and glue those onto the hat brim and trim. Glue one sprig of the berries on to the two leaves. Again, I used clips to hold the leaves in place while they dried

Step Three: Cut two strips from the soft red felt that measure 7 inches long by 2.5 inches wide. Fringe one of the edges on each. Over lap the two non-fringed edges on the 'back' of the snowman and glue. The fringed edges can be crossed or gently tied in the front.

Step Four: draw a mouth and two dots for eyes on the front of the snowman. It helps if you leave the hat into place for the placement of the eyes so they show beneath the brim of the hat. Glue the nose onto the snowman and place him on his back while the nose sets up. You can glue the hat to the top of the glass if you wish. Add another sprig and berries to the bottom of the front. You can even create a 'bow tie' for added cuteness! A candle under the snowman provides a wonderful effect, but when I give this gift to someone with children, I include one of the flickering battery operated mini candles instead.

Saturday, December 6, 2008

12 Days of Christmas Gift Giving - Day 6

Today's project is brought to you by Robin Gibbons.

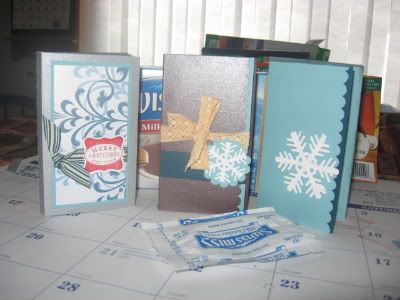
Giving a handmade card to neighbors and friends is a wonderful way to show you care. This project is more than just a card. It’s a box that stores a pack of hot chocolate! Give the gift of a warm cuppa to a friend!
Supplies needed 8.5 x 11 sheet of card stock ( i am using Card Stock out of the December kit) bone folder and ruler for scoring or a trimmer with a scoring blade heavy duty glue or tape runner embellishments or stamps
1. Turn Card Stock so 11 inch side is horizontal
2. Score Card stock at 1/4 then at 3.5, then at 4 inches, then at 7 1.4 inches then again at 7 3/4 inches. This will give your box a depth of 1/2 and inch and the width of 3 1/4.
3.Then turn your Card stock the other direction. Score each side at 1 inch then at 1.5 inches.
4. Using your trimmer or scissors cut your cs at the 1 1/2 score line you just made up toward the top of the sheet that has the 1/4 inch score line. STOP at the 4 inch score line that you did in the 2nd step. That score line is the side of your box.
5. After you end up with your T shape Cut the little corners of the box that were made by your score lines
6.Now you are ready to decorate! Fold all your score lines leaving the "pretty" side of your card stock on the mountain side of your folds. The Card stock I am using is the cranberry color with the shimmer from the December kit. I wanted the shiny side on the outside of my box.
7.Decorate the front and inside before you glue! I have added more embellishments and ribbon to my front. To glue the box glue the 1/4 inch strip and the bottom flaps of your "inside" part of the card. Be sure to let it sit and dry before you put the coco pack into the box.

Friday, December 5, 2008

12 Days of Christmas Gift Giving - Day 5


Today's gift is brought to you by Deb Harter!!
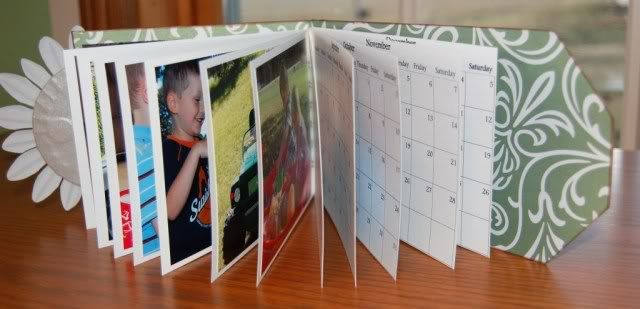
For today's gift, we are using the large magnetic card in your December kit to create a calendar.

1. Use a craft knife to cut the card apart at the seam.

2. Measure patterned paper to cover front and back of front cover of card, and adhere paper to cover.

3. Trace and cut paper to fit inside of back cover and adhere to cover.

4. I created my calendars using a program like Word. The calendar pages measure 5 3/4 inches wide by 4 1/2 inches high. Keep in mind, you will be punching holes on the left side, so when creating your calendar, allow room for that. If you would like to use my calendar templates, let me know, and I'll just email you mine. It will save you a ton of time. Print your calendars on white cardstock, and punch holes in them with a Bind-It-All. If you don't have a BIA, you can use a hole punch to punch a couple of holes and use book rings.

5. Punch your covers, and assemble your calendar. Again, you can use book rings instead of the BIA.

6. Embellish as desired. I used a large Heidi Swapp flower and painted a chipboard center to match the paper and used rub ons for the "2009" and flourishes.

7. Add your pictures, and you are done!


Thursday, December 4, 2008

12 Days of Holiday Gift Giving - Day 4


Day four is brought to you by Chris Pozzi. :D
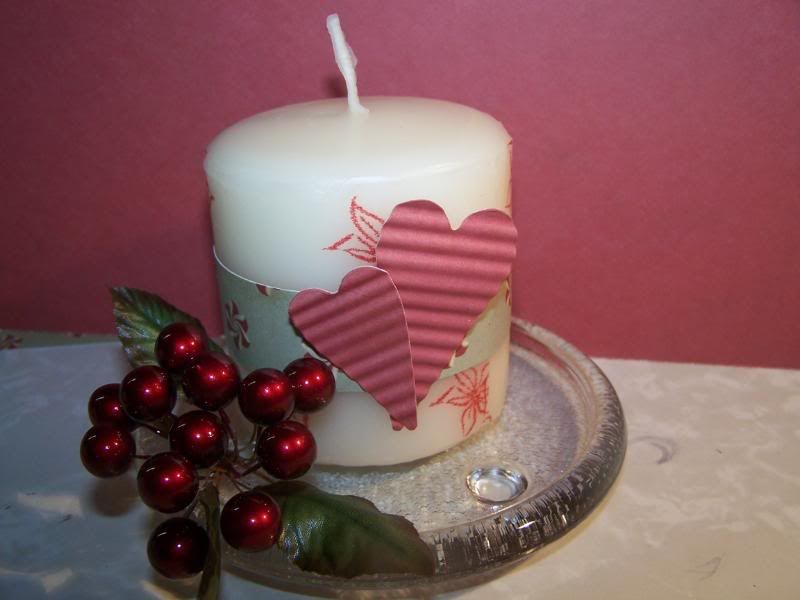
Today will make a Stamped Candle

supplies: tissue paper, candle, stamps and ink, heat gun, misc embellishments

1. Cut the tissue paper to fit candle.

2. Stamp on tissue paper as desired. This is perfect time to use those Christmas Stamps! :D

3. Adhere the tissue paper to candle by laying tissue paper over candle and heating candle with Heat gun. CAUTION THIS DOES GET VERY HOT AND THIS PART OF PROJECT NOT FOR CHILDREN.

4. Once the paper is adhered, add patterned paper and embellishments as desired

Wednesday, December 3, 2008

12 Days of Gift Giving - Day 3

Day 3 of Gift Giving brought to you by Jules Eickmeier

These pretty gifts take about an hour and fifteen minutes to construct and make sweet presents for last minute exchanges or for that special person.

Step One: download a vintage image from on-line. I googled "free Vintage Christmas images" and found several I could not resist. Right click on the image and then click "save image as" from the menu that will appear. I generally make a desktop file for these and then select that file so the image will download there. I use Picasa (a free Google photo editing program) to sharpen the image. Then I print the image onto matte photo paper, cream colored card stock or artist's canvas paper, which is my personal favorite.

Step Two: I use a variety of inks and paints to enhance the image. In this case, I used Lumieres and Pearlescent paints to add sparkle and Stickles to add some glimmer and glow. If you do not have any of the Lumieres or Pearlescents, in my tech this month, I showed how to add Glimmer Mist to acrylic paints to get a shimmering paint. Apply this lightly to accent. I tore the edges of the image and used a gold Krylon ink to smudge and distress.

Step Three: I purchased a 'floating frame' at a craft store (and used a coupon so it cost less than 4.00) in the picture framing section. This one is 8x10 but they come in an assortment of sizes and frames. I wanted to antique the frames, which come in black. I dabbed gold acrylic paint and some copper onto the frame with my fingers. I allowed this to set up just a bit and then rubbed it in. If you get too much paint or do not like the appearance, merely use a blender (alcohol) to remove amounts until you are happy with it. You can also age it with Alcohol inks (Ranger) or with Krylon inks from the leafing pens.

Step Four: I crumpled and sanded a piece of the wonderful paper from the Dec. KnK kit after cutting it slightly larger than the image of the little girl. I placed it an an angle on the bottom part of the floating frame. I arranged other elements such as the ribbons, adhereing these from their backs to the bottom piece. Finally, I placed the image again securing it to the bottom piece and MAKING SURE THE HANGING ELEMENT ON THE BACK WAS COVERED. I placed the top glass over this and carefully slid the four frame pieces into place.

HINTS: 1. the hardest part is keeping the acrylic back and the glass topper clean during this. Try gloves or handle with tissue paper. Kleenex and paper towels leave a "dusting". 2. if there are smudges, try cleaning the glass with a glass cleaner and newspaper to avoid the "dusting". 3. different images produce different looks so you can make these cute or classy or even go retro!

12 days of Gift Giving Day - 2

Happy Day 2 of our 12 Days of Holiday Gift Giving Fun!
Brought to you by Chris Pozzi

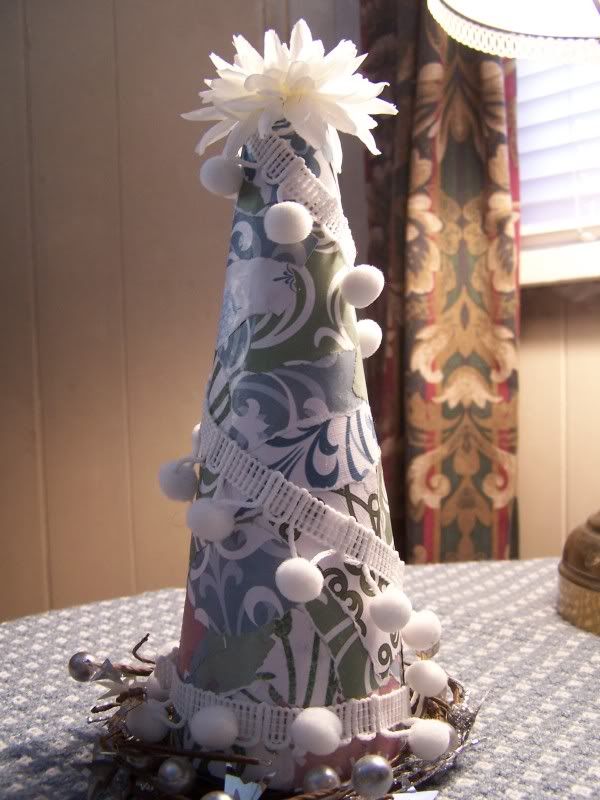
Today you will be making a mini Christmas tree. These would also make great teacher gifts and are great for kids projects. (a little messy so be sure to cover your table :D)

For this project you will need
Styrofoam cone
Scraps of papers (any color, style, mix of manufacturers… I use scraps from Dec. Kit)
Glue (I used scrappy glue and tacky glue)
Lace/pom poms/Ribbon or anything for garland
Topper (I used a large daisy and a button)

Start tearing your scraps into pieces (yep tear them!) The goal is no straight edges.Starting at bottom of cone adhere pieces with glue working your way around the cone. (I glued under paper and sealed edges with glue too.)
Continue place pieces all the way to the top. Once tree is finished, add garland (I used the pompom strands but could use ribbons, a strand of beads, Faux pearls, anything your heart desires). NOTE: I used pins to attach garland rather than trying to glue it.

Add tree topper.(I used a matching double daisy but in past I have used poinsettias etc too.)
I added a $1 store candle ring around mine for a little more pizazz.

Tuesday, December 2, 2008

12 Days of Gift Giving - Day 1


Day 1 of gift giving brought to you by Pam Bennett

OK...we are starting out simple

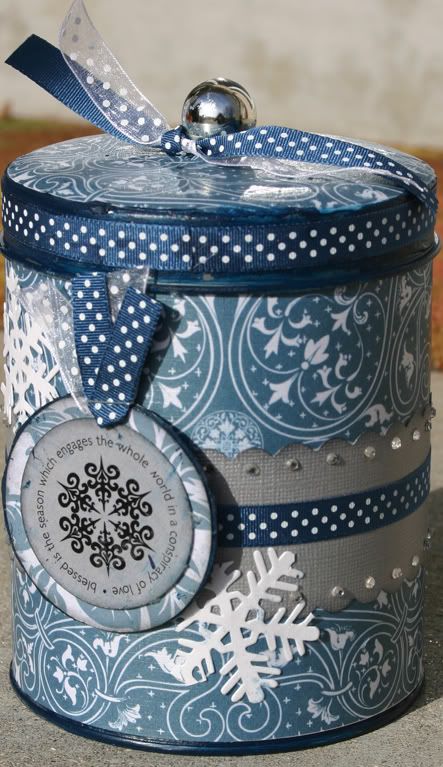
Here is an altered tin that i made for a Christmas gift, but now Gerri-anne wants it, so I am sending it to her It was pretty easy!

First....find a tin. This happens to be one I found in the clearance aisle somewhere last year (I think Target). Then you need to either paint it with acrylic paint or sand it with sandpaper. This step is necessary to help the adhesive stick to the tin and paper. Painting also helps if you have any curves or bumps that are hard to cover with paper.

Next....... cut the paper to fit. Many tins are larger than 12 inches. so you may need to cut more than one strip of paper. Try and match patterns if possible. Now, you need some adhesive. I recommend Mod Podge, applied with a foam brush. Use a thin, even layer. Apply the paper. You will need to hold it in place, but it will eventually stick.

Let it dry...as it dries, bubbles may appear. Smooth them out with your fingers. Let the tin dry. For the top, I cut a circle to the size of the tin, and adhered the same way.

If there is a handle or knob, just cut out a hole with your exacto knife. You can cut the circle halfway to get it around the knob...the cut won't be visible once you adhere it and mod podge the top. Now you can embellish with other papers. I used my Fiskars threading waters punch, and ran a strip around the tin. After you finish with the papers, you need to protect them with a layer of Mod Podge. Again, the layer should be thin and even.

More embellishments can be done...any bling and ribbon can be added after the top layer of Mod Podge is on...it can act as the adhesive.

To finish it off, I just tied some ribbon to the top. I'll fill it will some goodies and get it in the mail!